
 |
 |
 |
 |
 |
 |
 |
 |
 |
 |
 |
 |
 |
SIMULATION: TUTORIAL
Step 2: CREATING ROUTES
ROUTES: WHAT FOR?
CREATE A NEW ROUTE: INTRODUCTION TO THE ROUTE EDIT MENU
CREATING ROUTES SECTIONS
SCANNING AND CHECKING A ROUTE
HANDLING SIDINGS AND REVERSALS WITHIN ROUTES
ANOTHER ROUTE EXAMPLE
ROUTES: WHAT FOR?
The goal of CDM-Rail, when driving a real layout, is to be able to "manually" control one train (or a few trains)
at a time, while leaving all others trains travel automatically.
This is the purpose of "routes". Before starting simulation or RUN, any train may be attached to a route,
which it will travel on indefinitely.
This is why, in CDM-Rail approach, all static routes are in "closed-loop" form, so that there is no beginning,
no end.
Let's mention that any train may be
-
disconnected from its route at any time,
-
reconnected to another route,
-
or assigned to reach another point in the layout, from its current location, by using an "on-the-fly route"
(temporarily defined interactively while the layout is running).
In the following, only the static routes (that is those created before RUN) will be discussed.
"On-the-fly" routes will be covered in a specific user note.
A route is built as a set of connected blocks, also named "sections".
A section is exactly what has been defined as a block, that is a portion of track included between two signals
with the same direction.
BACK TO TOP OF PAGE
|
|
|
|
CREATING A NEW ROUTE: INTRODUCTION TO THE ROUTE EDIT MENU
In order to create a new route, select
"Routes" >> "New route"
from the main menu bar and the pop-up "routes" window.
CDM-Rail then switches to mode "Route edition", with a specific toolbar below the main menu bar,
and prompts for capturing the name of the new route, to be created.
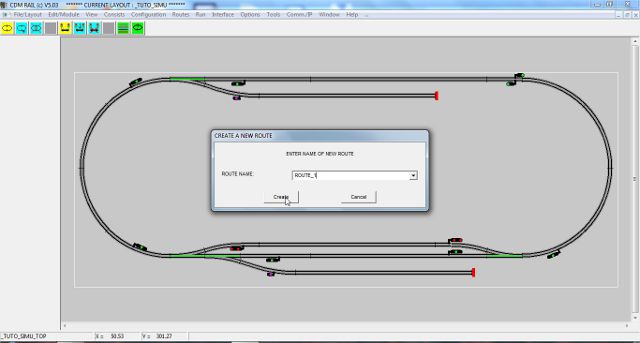
Figure 2-1: route name capture (click to zoom)

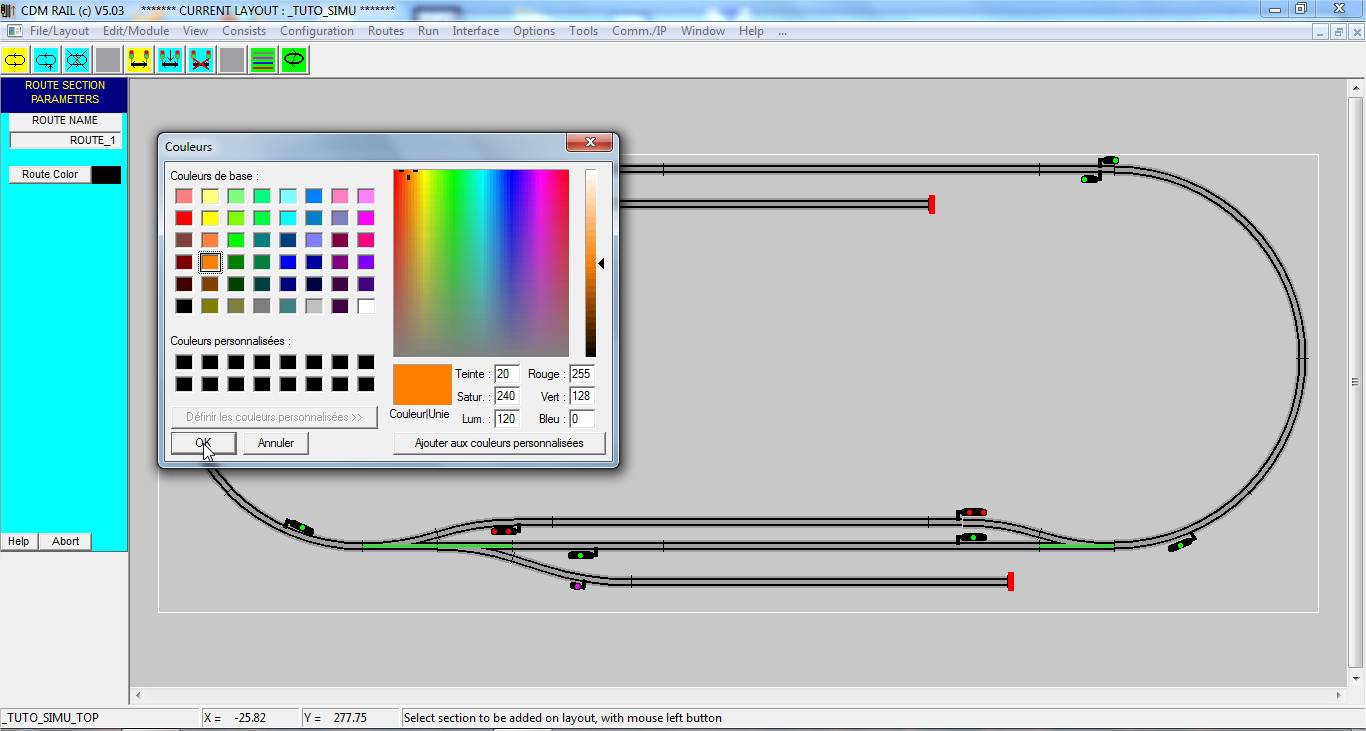
Once the name is entered, and validated by clicking button "Create", a specific menu appears on left of screen,
with route name, and a "Route color" button.
The default color is black. If you wish to modifiy this color, just click the "Route color" button, and the
standard Windows color selection window will pop up. In the following example, the route color has been
modified to orange; click "OK" for confirming.
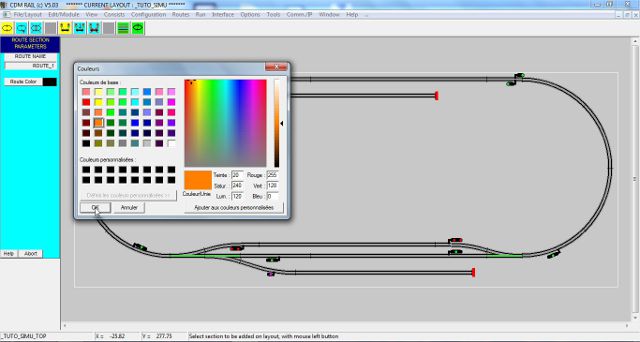
Figure 2-2: color selection window (click to zoom)
The route edit toolbar consists of eight active icons (the grey icons are inactive).
From left to right:
-
Create a new route (yellow icon)
-
modify an existing route
-
delete a route
-
add a new section to current route (yellow icon)
-
modify an existing section
-
delete a section
-
layer (zone) colors and options (green icon))
-
route display mode (green icon)

Figure 2-3: Route edit toolbar
For this first route, we want to make the train stop in station on the pass track for 10 seconds, and then make
two loops on the layout oval, before halting again on the pass track.
BACK TO TOP OF PAGE
|
|
|
|
CREATING ROUTE SECTIONS
Once the route is created, the software waits for selection of a first section for this route.
Click on the leftmost semicircle (see figure below): the candidate section is sketched in white, and the parameter
menu for that section appears on left of screen.
Note that for section selection, you can click on any track segment included in that section, except for turnouts.
This menu allows to:
-
set the maximum speed on this specific section (field "Speed"),
specifiy whether the train should stop at the end of this section (group "stop control"),
-
select the opposite travel direction.
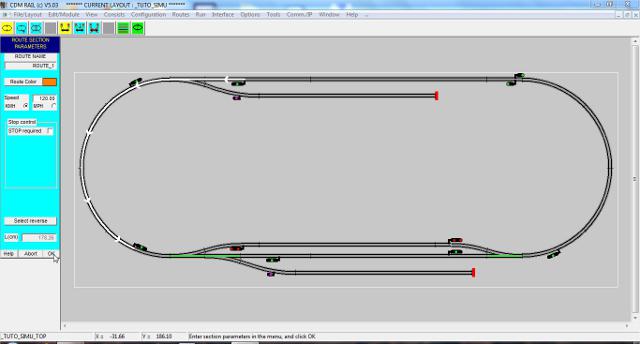
Figure 2-4: creating the first section (click to zoom)
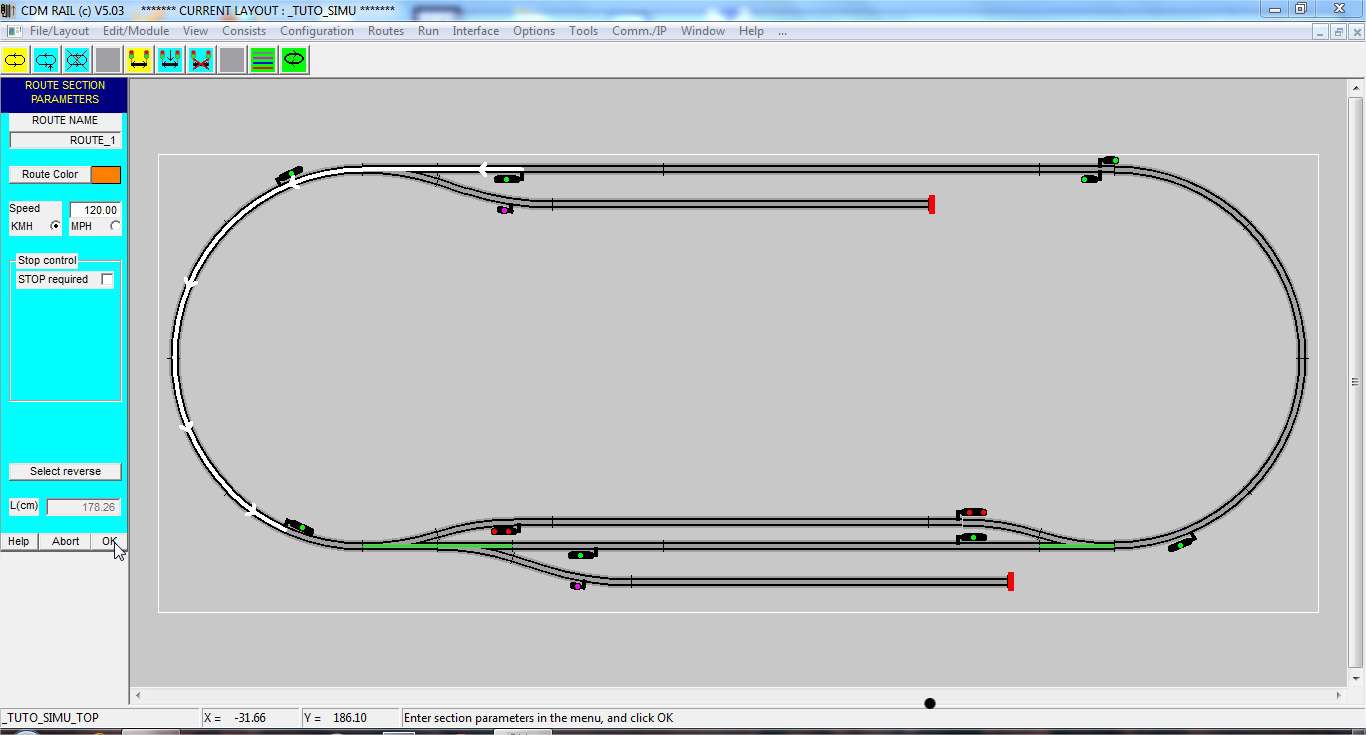
For this first section, just keep the default parameters: so click "OK".
The new section is redrawn with the specified colors, and the two partial route ends are marked with black circular
symbols.
Now, we want to select the next pass track, and make the train stop on it.
And in order to do that, the turnout which gives access to this track (the lower left turnout) must be set to the proper
state: deviated, in that case. Any turnout state may be set by mouse clicking (see figure below).
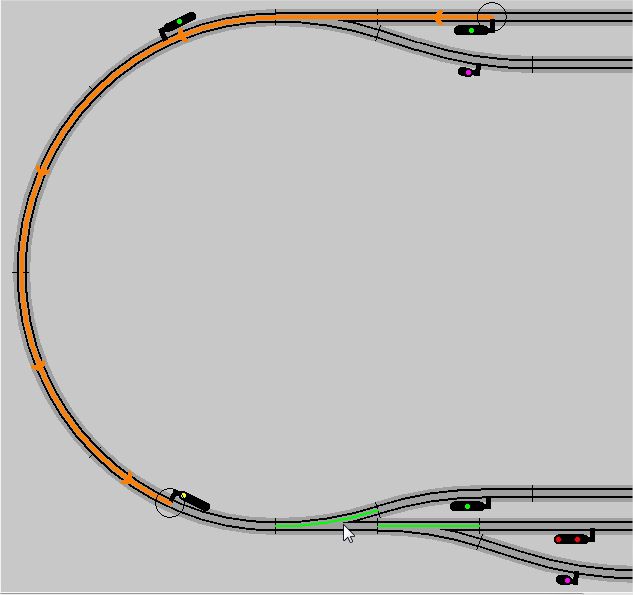
Figure 2-5: setting the proper turnout state by mouse clicking.
Once the turnout is in the proper state, you can click any non-turnout track segment on this pass to select the pass:
see figure below.
But here, in order to make the train halt for 10 seconds, we have to:
-
ckeck box "STOP required",
-
set the "duration" to 10 (seconds),
-
leave box "reverse dir" unchecked.

Figure 2-6: setting the stop parameters (click to zoom).
Likewise, create the two next sections.
In order to create the next section on the right semicircle, it will be necessary to toggle the lower right turnout to
deviated.
The figure below shows what happens when clicking OK after selection of the fourth section: the program detects
that the end of the new (candidate) section matches the start point of the route, and thus prompts for closing and
ending the route (see figure below).
Since we want to have two loops on this route, and not only one, click on "NO".
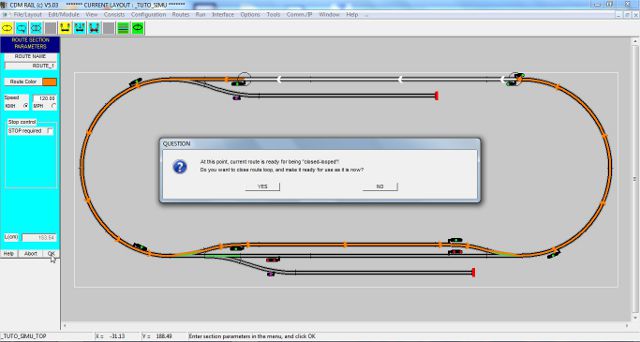
Figure 2.7: prompt for closing the loop (No in that case).

Select the next section (see figure below). The problem, here, is that this section is superimposed to the first
one.
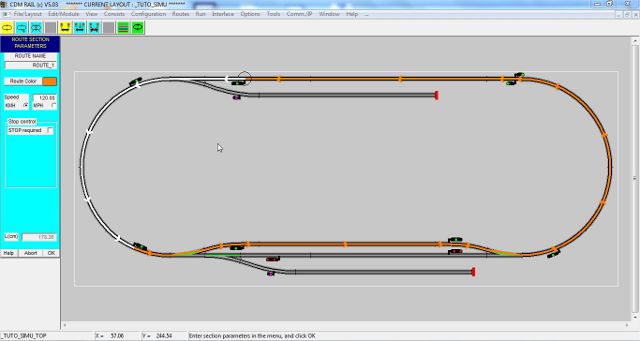
Figure 2.8: New section superimposed to the first section.
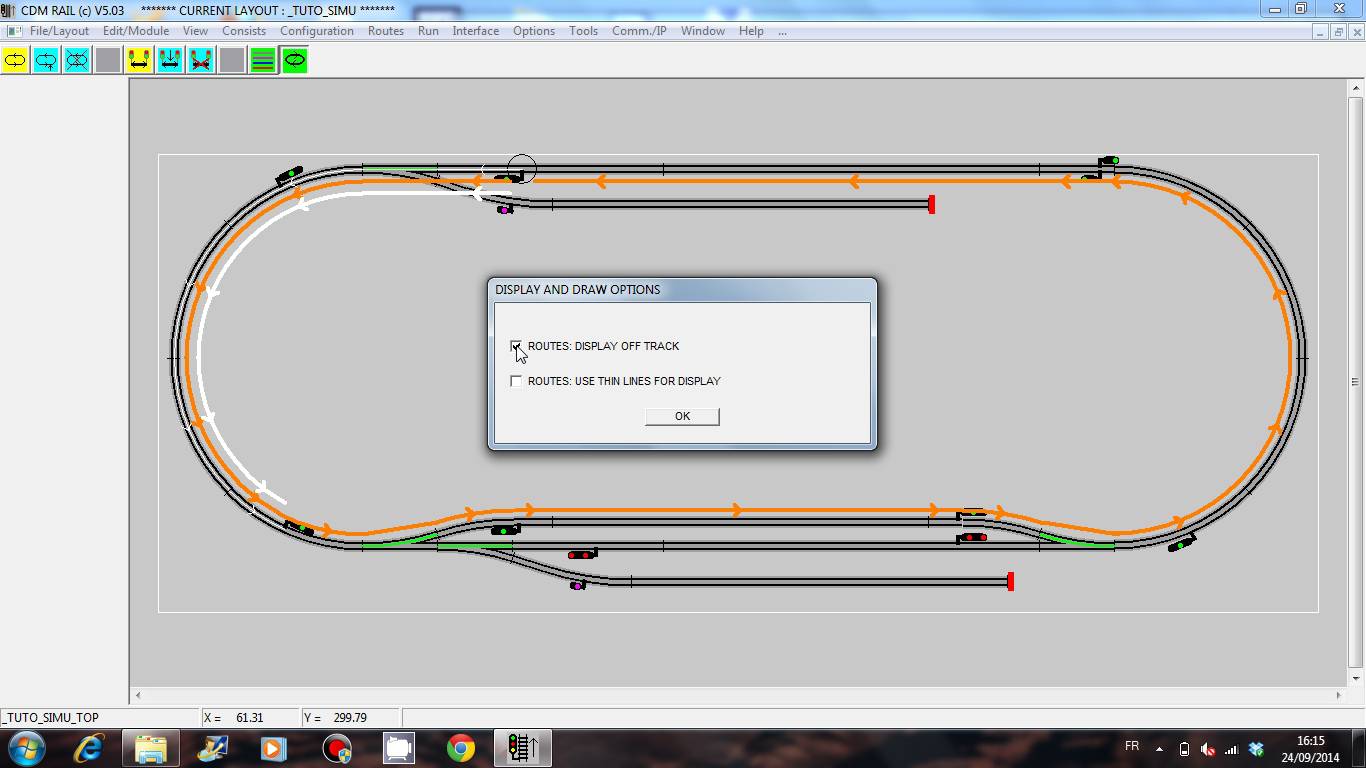
Since this may be very confusing on more complex routes, there is an option which allows to draw the route
sections "off-track", in order to make it possible to view all sections, even if they are superimposed.
This option is accessible by clicking on the rightmost green icon (route display mode), in the route toolbar.
When clicking on that icon, a window pops-up, as shown below, and offers two options:
-
ROUTES: DISPLAY OFF TRACK
-
ROUTES: USE THIN LINES FOR DISPLAY
If the first option is checked, the result is as shown in the figure below.
Note that the new section is now sketched apart from the first one.
In addition, another (thin) line is sketched on the axis of the track, so as to help viewing which track is
currently selected, which is not obvious whenever there are several parallel tracks.
Once the option window is cleared, by clicking "OK", it is necessary to re-select the section at hand,
by clicking on the section modification icon (second icon of the second group).

Figure 2-9: Display route "off track" for better readability (click to zoom).
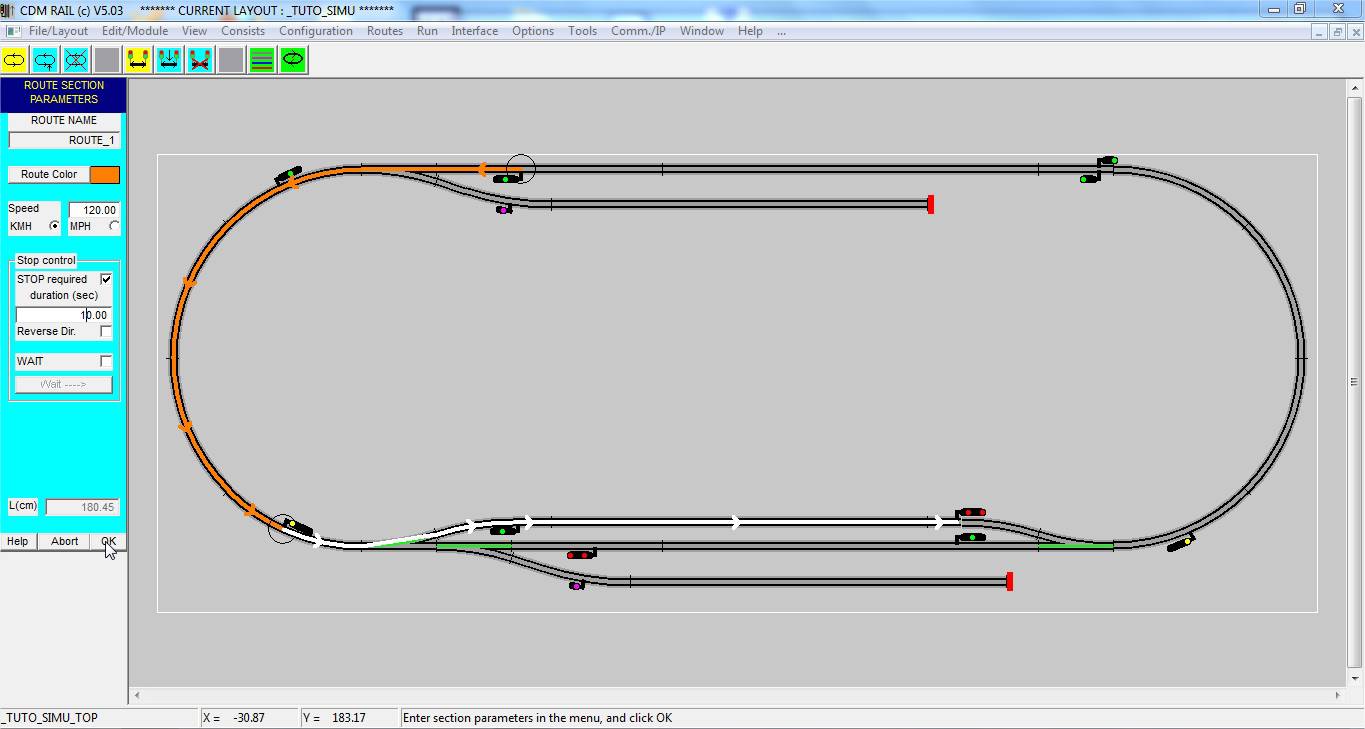
Next, create the following sections, and make sure that this new loop goes through the main track
(that is: click on turnouts to set them to NON deviated).
Upon completion of the second loop, the same message as ealier pops-up, to inform that the route can
be looped and finalized (see figure below). This time, click YES to end the route creation process.
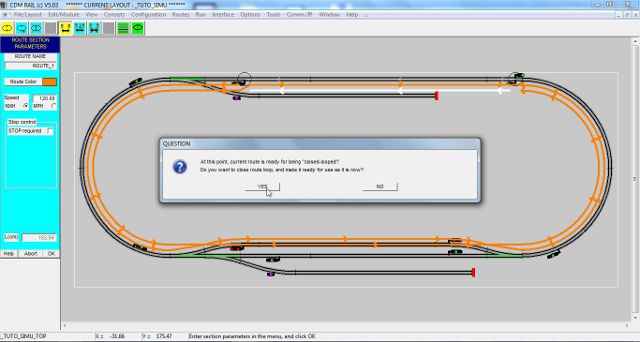
Figure 2-10: click YES to finalize creation of ROUTE_1
BACK TO TOP OF PAGE
|
|
|
|
SCANNING AND CHECKING A ROUTE
Once a route has been created, there is a convenient way of rapidly checking whether all sections are OK,
as well as section parameters (maximum speed, stop options,...).
This is done by route display or modification:
-
either select "Routes" >> "Modify route" from the main menu bar,
-
or click on the second (blue) icon of the first group, in the route toolbar.
Either of these actions displays the route selection menu, where route name can be selected from a "combo box"
list.
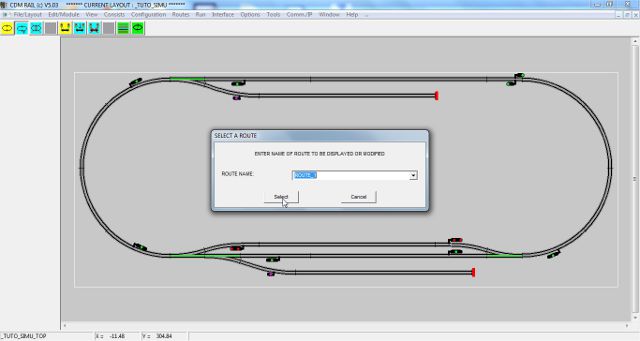
Figure 2-11: Selection of the route to be displayed (and/or modifed).
Then, click on the first section to be checked (see figure below).
From that point on, you can travel along the loop in forward or reverse direction, by clicking on buttons
"Select next" and "Select previous".
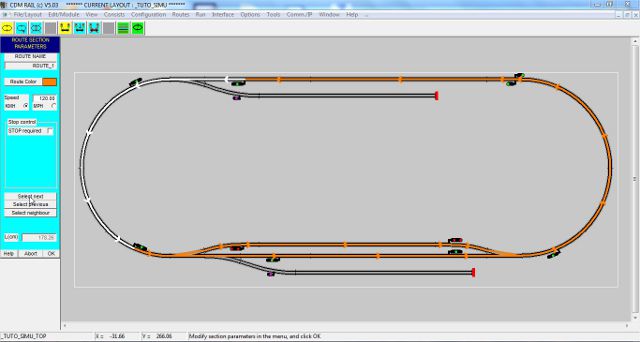
Figure 2-12: viewing section and section parameters
(click to zoom)

BACK TO TOP OF PAGE
|
|
|
|
HANDLING SIDINGS AND REVERSALS WITHIN ROUTES
In this chapter, we want to create a second route, (named "SIDING_1"), involving the lower siding.
So, let's create this route (named SIDING_1), first, as seen earlier:
-
either from the main menu bar "Routes" >> "New route"
-
or by clicking on the leftmost (yellow) icon, in the route toolbar.
Then, click on the lower siding: the candidate section should highlight as below.
If this is not he case, click on buton "Select reverse", bottom of lefthand section parameter menu..
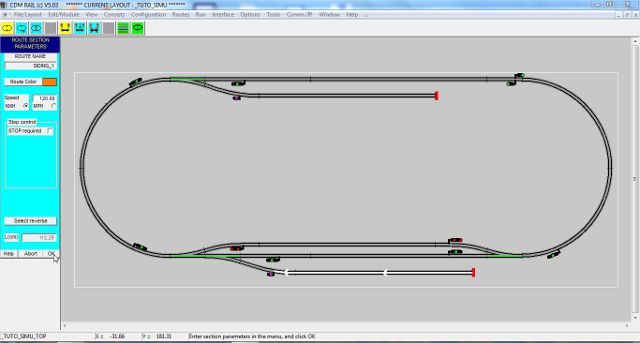
Figure 2-13: select lower siding (click to zoom)
For clicking on the next section (lefthand semicircle), it is necessary to click the siding turnout to the proper state
(giving access to the siding).
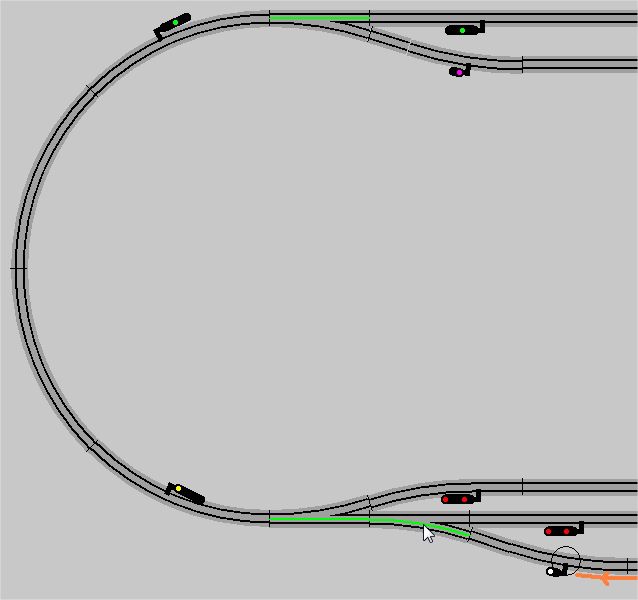
Figure 2-14: click turnout to the proper position.
We can now select the next section. However, the situation is more complex than usual, here, since we want
the train to restart counterclockwise. The reason for this is that, as to avoid deadlock situations between the
three trains which we want to run, they must travel in the same direction on the single track layout oval.
This is why we must specify a reversal at this point:
-
check the "Stop required" checkbox,
-
check the "Reverse dir" checkbox,
-
specify a stop duration of 1, as to make the train restart immediately,
-
click OK to confirm section.
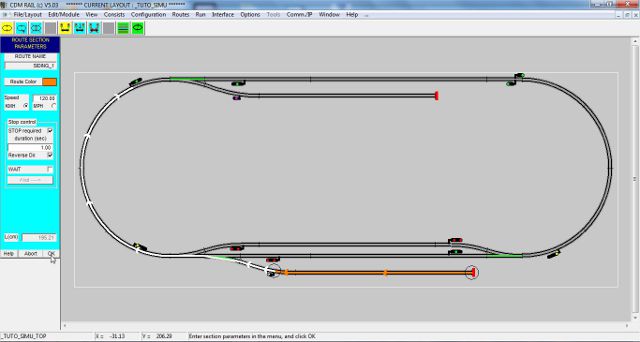
Figure 2-15: specifying train reversal (click to zoom)

Since reversal has been specified, the same section can now be selected in reverse direction, by just clicking at the
same place.
Click "OK" to confirm.
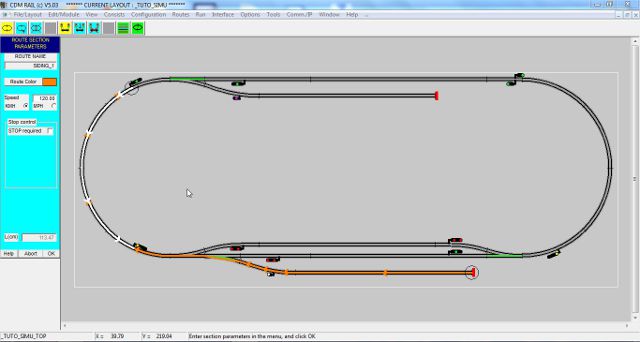
Figure 2-16: same section in reverse direction (click to zoom)

Set turnout to non deviated position, to select the main track.
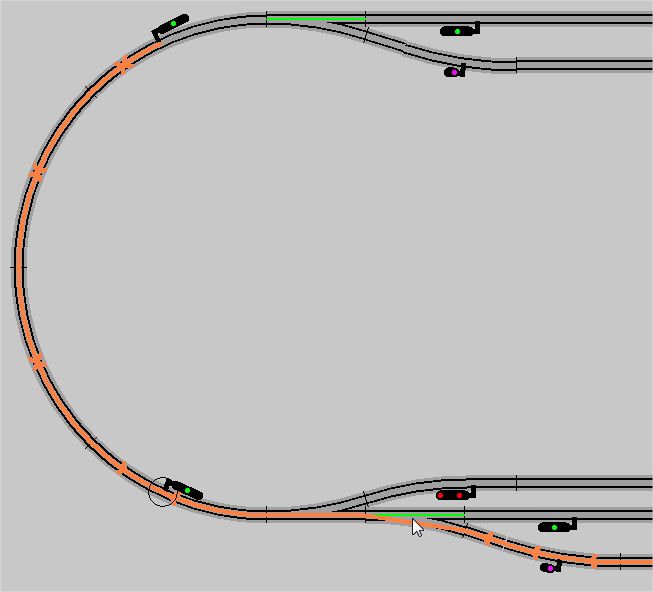
Figure 2-17: click turnout to non-deviated.
Then, create the three following sections, with default parameters (no stops).
On selecting the foruth next section, we get the following. This candidate section is superimposed to a previous
section.
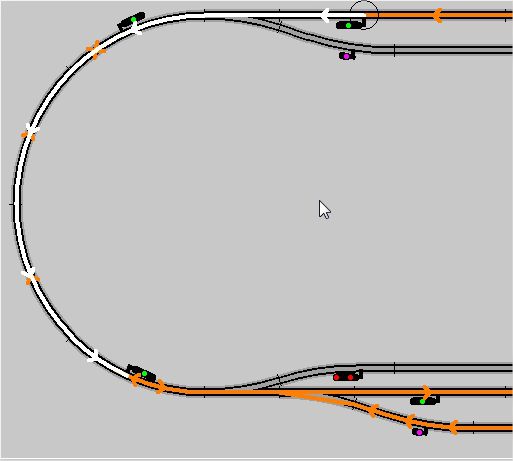
Figure 2-18: new section is superimposed to a another one
So, as seen earlier, click on the "route display mode" icon (rightmost green icon in the toolbar), and check
"ROUTES: display off track". The display is modified as shown below.
Figure 2-19: split display
The ultimate step is to go back on the origin siding. So:
-
Set the siding turnout to deviated,
-
Both " stop required" and "Reverse Dir" boxes are checked by default, since there is no choice,
-
Set stop duration to 30 seconds,
-
Click OK to confirm,
-
The (now familiar) route close window pops-up (figure below). Click Yes to finalize route.
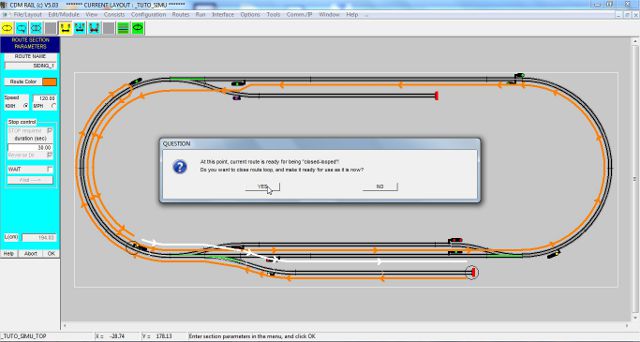
Figure 2-20: After clicking OK on the last section.

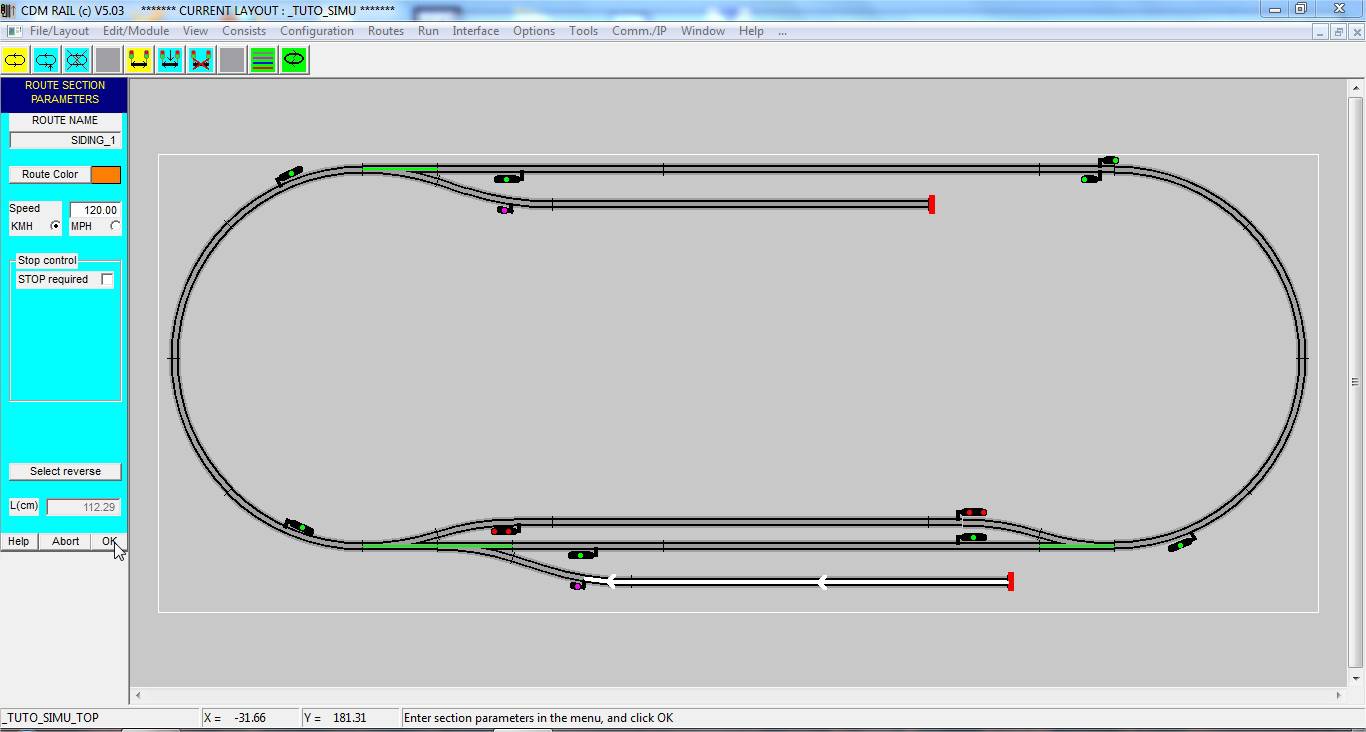
And here is the final aspect of route "SIDING_1"
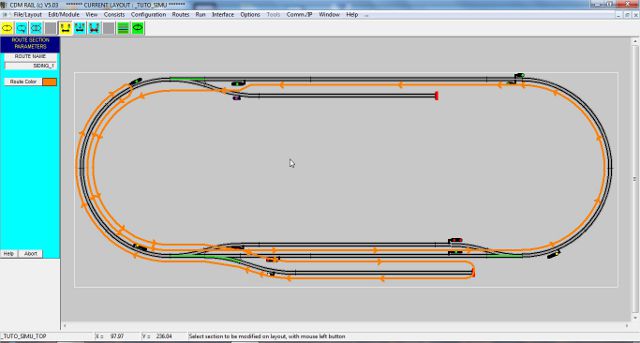
Figure 2-21: route "SIDING_1"
BACK TO TOP OF PAGE
|
|
|
|
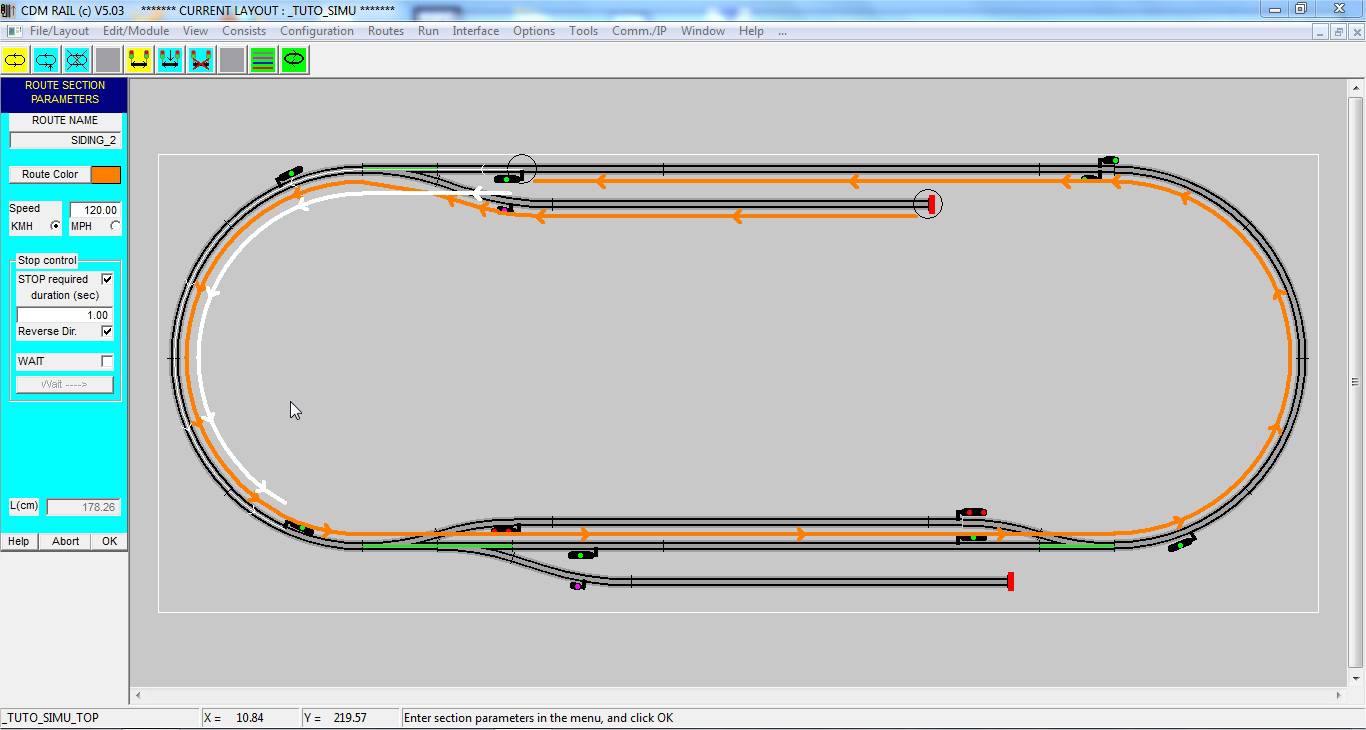
ANOTHER ROUTE EXAMPLE
We have one third route to create: the one using the top siding.
So let's create our third route, and name it "SIDING_2" (see here if already forgotten)
As in previous section, let us click on the upper siding and start defining the first section.
Then define the next four sections, in counterclockwise mode, making sure that the route uses the main (straight)
track, on bottom horizontal portion.
The problem at hand, now, is to make the train reverse direction on the leftmost semicircle, and come back
to its departure siding.
The figure below shows the capture of the semicircle section, with following parameters:
-
check the "Stop required" checkbox,
-
check the "Reverse dir" checkbox,
-
specify a stop duration of 1, as to make the train restart immediately.
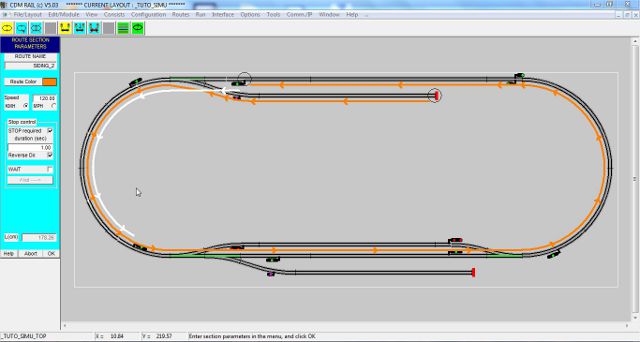
Figure 2-22: setting the parameters for direction reversal (click to zoom)
Click OK, and add the two remaining sections. The figure below shows the what the screen looks like just before
clicking OK for the last section. Notice the wait time set at 20 seconds.

Figure 2-23: just before clicking OK for the last section (click to zoom)
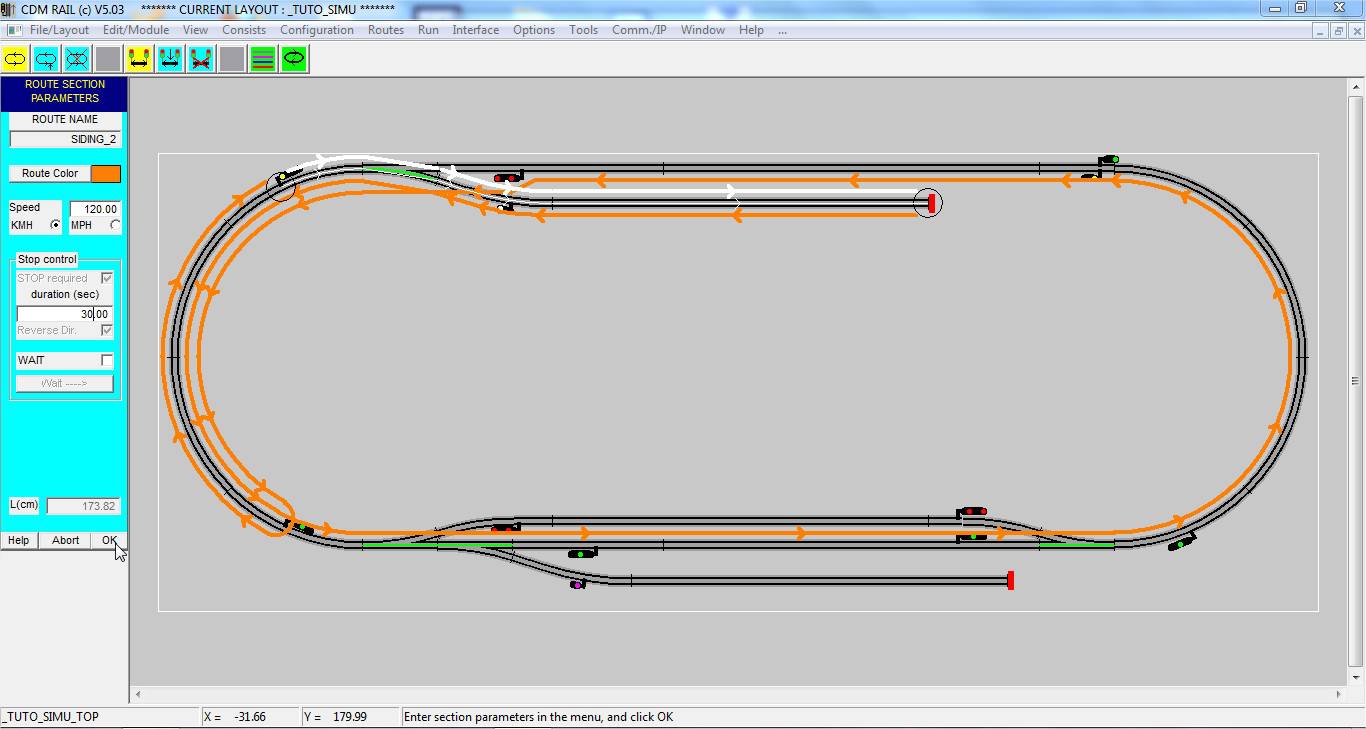
The familiar windows pops up, for asking whether the route should be "closed-looped" and finalized.
Click "YES".
The final aspect of route "SIDING_2" is shown below.

Figure 2-24: route "SIDING_2".
Download layout at the end of this step: TUTO_SIMU_02.lay
And now let's go the the next topic "TRAINS (CONSISTS) CREATION"
Click on rigtht arrow below
 |
BACK TO TOP OF PAGE |
BACK TO TUTORIAL ROOT |
 |