| |
LAYOUT DRAWING: TUTORIAL
Step 6: ADD AN ARC (CURVE) SEGMENT
The arc segment corresponds to what is currently named "curve". The "Add arc segment" icon is the second
left-hand yellow (see figure below).

Figure 6-1: "Add arc segment" icon.
This drawing primitive must not be confused with the circular link (third left-hand yellow icon) which will be used in a
later step.
As in the straight track segment case, a parameter menu and a coordinate menu appear on the left of the screen, as soon as
the above icon is clicked (figure 6-2).
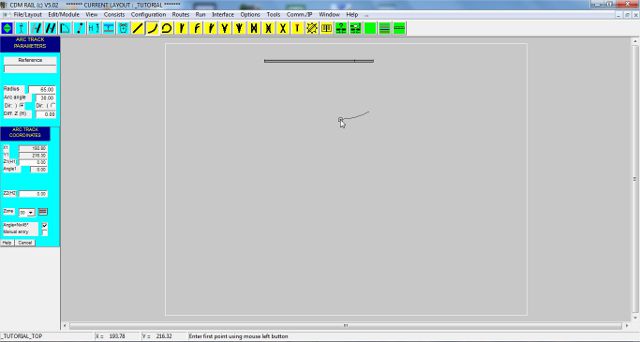
Figure 6-2: After click on icon "Add arc segment" .
We want a segment with radius 50 cm, angle 45°, and we want to place it on the right of the already placed straight section.
And since we want the curve downwards and not upwards, we need to change its direction.
In the parameter menu (figure 6-3), perform the three following modifications:
-
Enter value 50 in field "Radius".
-
Enter value 45 in field "Arc angle".
-
Click on radio button "Dir (" (the rightmost one): this changes the direction of the curve (clockwise or
counterclockwise).
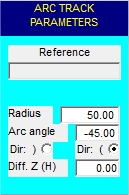
Figure 6-3: Arc segment parameters.
Note that, after capturing a value into a field, this value is taken into account only after pressing the Enter key,
or on accessing another field in the menu.
Any time a new parameter value is taken into account, the curve "skeleton" is redrawn according to the new
parameters.
Bring the mouse close to right-hand end of the straight section (figure 6-4), until snapping occurs.
Then, confirm placement by clicking on the left mouse button.
The add operation (like all other operations) remain active as long as no other icon is clicked.
(Pressing key escape also forces exit from current operation).
And parameters stay unchanged, at they last values.

Figure 6-4: Positioning the first arc segment, before confirmation click.
The add operation (like all other operations) remain active as long as no other icon is clicked.
(Pressing key escape also forces exit from current operation).
And parameters stay unchanged, at they last values.
Thus, repeat above operation three other times, and be sure that snapping occurs between any new segment, and
the preceding one: in that particulat case, it is easy to see, since segment rotation occurs on any new segment.
Figure 6-5 shows the screen immediately before the confirmation click for the fourth and last arc segment.

Figure 6-5: Repeat operation 4 times, to get half a circle.
The two next sections are devoted to adding turnouts:
Click on right arrow below
|