| |
LAYOUT DRAWING: TUTORIAL
Step 0: TUTORIAL OVERVIEW
This tutorial aims at a fast overview of all commands necessary for layout sketching.
It is built as a sequence of commented steps which you can simultaneaously mimic on CDM-Rail.
It is recommended to follow all steps of this tutorial, in order to learn and assimilate the minimum requirement
for a safe use of CDM-Rail.
We'll see:
-
how to add a track item (also referred as segment in CDM-Rail).
-
how to fix a wrong track item placement.
-
how to "zoom".
-
how to invoke track libraries.
-
how to chek the layout "connectivity".
The assistant (displayed the first time you launch CDM-Rail), can be used to create a new layout.
However, as soon as you feel more comfortable with the software, you may do the same operation directly
from the main menu bar: this is what we suggest you to do.
"File/Layout" >> "New layout"
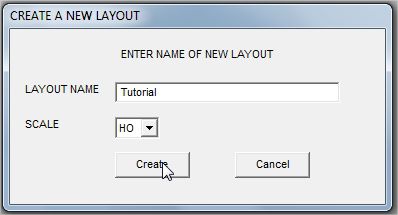
The following window pops up, and prompts you for capturing the layout name ("Tutorial" in the example
below)
and scale. When you press "create", another window pops up for selection of the work directory.
By default, this work directory is "Layout", under CDM-Rail installation root directory.
But it is better, in general, to choose your own work directory, within your familiar user space.
Note that if you had created the new layout from the assistant, you would not have had the choice for
layout name. It would have been created automatically, in directory "Layout".
Likewise, if you don't use the assistant, you may enter the "module edit" mode from the main menu bar
"Edit/Module" >> "Edit module layout (graphics) "
The module edition screen is recognizable thanks to the characteristic toolbar which appears on top of screen,
immediately
below the main menu bar.
The icons in this bar are sorted into three groups (see figure below)

Figure 0-1: edit toolbar icons
-
The blue (leftmost) icons are the track segment modification icons (for already placed segments):
-
The leftmost (deep blue) icon switched the menu to enter hierarchical (modular) edition:
too early... do not click on that icon at this point!
If ypu happen to click on that icon, click again on the same icon in the new menu, to get back to
this point.
-
The second lefmost icon is the simple selection icon, just for displaying parameters of anu item
selected.
-
The third icon is for moving segments.La troisième icône en partant de la gauche est l'icône de déplacement de segment.
-
The last blue icon (on the right of the blue icon group), which shows a paper basket, is intended
for deleting segments.
-
The yellow icons are for adding track items (segments). From left to right, the added items are:
-
Straight segment.
-
Arc segment. Equivalent to an off-the-shelf "curve".
-
Circular connection
-
Simple turnout.
-
....
-
And last of all, the green icons correspond to the layout connectivity check, which is escribed in the last
part of this tutorial.
Note that a dynamic text hint pops up any time the mouse cursor is moved over an icon (see next figure).
However, for this hint to appear, you must first click into the drawing area of the screen.

Figure 0-2: textual hint related to any icon
Before getting into the tutorial, let's mention that the resulting layouts (at the end of steps 6, 10, 11, and final)
have been stored in subdirectory ./Layouts/TUTORIALS, under CDM-Rail installation directory.
These files are named _TUTORIAL_06.lay, _TUTORIAL_10.lay, _TUTORIAL_11.lay, _TUTORIAL_final.lay.
Thus, if you want to jump to a specific tutorial step, you may retrieve the previous _TUTORIAL_xx.lay
and save it into your own tutorial file
-
First open it: "File/Layout" >> "Open Layout" (from main menu bar)
-
And then save it (in your work directory) under the name you have selected for the tutorial
(Tutorial.lay in this example).
"File/Layout" >> "Save Layout As" (from main menu bar).
Also note that it is a good practice to Save your layout frequently (in this tutorial: at the end of any step).
"File/Layout" >> "Save Layout"
Let's now place our first track segment: click on right arrow below
|


